A Simple and efficient Face direction detection in React
From a seemingly simple project emerged a significant learning experience. I’ve distilled this knowledge into a straightforward example, demonstrating how to use Javascript to determine the direction of a face.

Is my face pointing up or down? That was the question I was curious to solve using only a static web-based client infrastructure. My first lead pointed me to Google’s MediaPipes’ Face Mesh docs. There they have links to various languages to leverage their AI face modeling solution on Codepen. The demo was useful in quickly getting a grasp of how the library worked and ways to manipulate it.
The mesh is essentially a collection of points organized in an array. Each index in this array corresponds to a specific point on the 3D face we create. To make things easier, I’ve labeled these points in my code example. That’s where the live tags in my demo come in handy, a massive aide in navigating through the mesh.
At this point, I understood the face mesh structure and had the code to transform into React components. However, I still needed to capture the orientation of the face. I experimented with several approaches, employing techniques like tracking the irises directions or eyebrows positions based on the blended face index (i.e. FaceLandmarker.FACE_LANDMARKS_IRIS). Unfortunately, this approach was unreliable and required me to recalibrating the baseline position of the user whenever there was significant movement along the 3D-X axis.
I got back to Googling and found this example where the writer used some clever logic to understand pitch and yaw of the face mesh. (Which she also kindly created a demo in Codepen.) Reading through the logic, code, and use of OpenCV felt overweight and more complex then I needed it to be. Though, the use of triangular direction is what directed me toward the code base I ended up creating.
Now that I had a clearer idea of what I needed, I conducted some additional research. I stumbled upon a React app featuring a face mesh that was not only wonderfully concise but also well-organized. It served as an excellent template for integrating my directional logic.
I started refining the simplest method to determine direction. Initially, I utilized the indexed landmarks on both sides of the nose, positioned naturally behind the nose tip on the face. This provided a suitable z-coordinate for computing the triangle (arrow), serving as my directional indicator. To establish a line extending directly backward from the nose tip (instead of formulating the 2d canvas coordinates as Susanne used), I identified the midpoint of the base of the triangle formed by connecting the left-of-nose and right-of-nose points. Subsequently, I drew a line vertically upwards (y + 50) from this midpoint.

Now, I’ve got this perfect compass that tells me where my head is pointing. The triangle’s angle, swinging up or down on the Y-axis from the midpoint to the nose tip, gives me the pitch. If it’s 90+, that means I’m pointing down; 90- means I’m looking up. The triangle’s angle on the +/- Y-axis at the midpoint tells me about the yaw. If it’s 90+, I’m facing right; 90- means I’m facing left.
By using the base of the nose as the 2D plane to derive my direction from and my face mesh nose tip as the directional indicator I was able to use the angles of the triangle to understand the direction of the facemesh without additional libraries or matrix based algebra. Pretty cool.
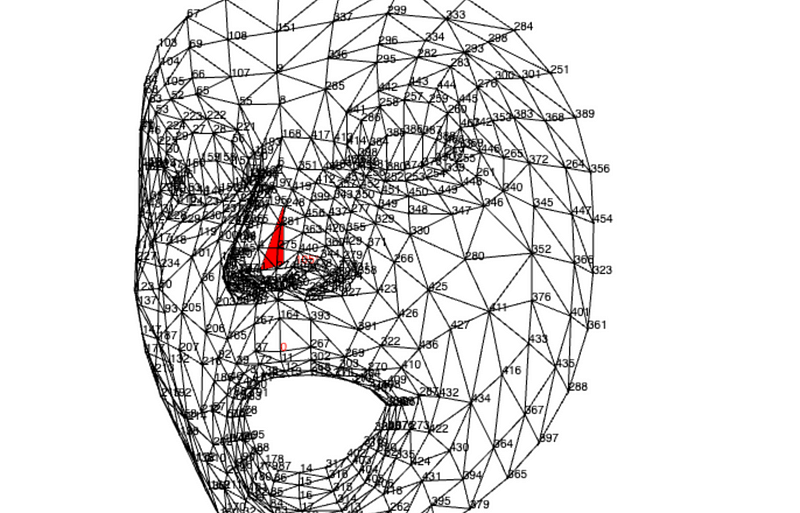
By leveraging the base of the nose as my 2D reference plane and utilizing the face mesh nose tip as a directional indicator, I managed to derive the direction of the face mesh by analyzing the angles of the respective triangles formed. The added bonus is it doesn’t require any additional libraries or matrix-based algebra!
The code for my version of the direction-of-head project is on: Github and a live GH Pages Demo.
I wouldn‘;’t have landed here without the work of Google’s MediaPipes web library, Magda O.’s or Susanne T.’s sample react projects. Thanks all!